
Registered Nurse | Healthcare Experience Since 2009
There are many, many places to check a pulse rate. The best way is with a heart monitor or a handy little device called a pulse oximeter but even without one of these, checking a pulse is pretty easy. The average pulse should be between 60-100 beats per minute (abbreviated as bpm).
Table of Contents
Checking Manually
The two most common and easiest places to manually check a pulse are at the wrist (radial) and neck (carotid). Both of these are best checked with your index and middle finger side by side.
Do not use your thumb. The pulse in your thumb can be strong enough to make you think you are feeling the patient’s pulse, but you are actually feeling your own through your thumb. There should be absolutely no movement or talking while manually checking a pulse rate.

Radial Pulse
The radial artery is located in the wrist and is fairly easy to find. It is right below the thumb on the inside of the hand. Make sure the patient’s wrist is resting comfortably on a flat surface with the inside of the hand facing up so the area is clearly visible.
Your two fingers should push slightly down on the wrist but only slightly. If you still can’t feel a pulse, which is indicated by a slight push against the fingers, then move your fingers around the wrist area a bit more until it is felt. Try the other wrist if you can’t seem to feel it on that one. Once you find one, you should keep your fingers in place and count the pushes for one full minute to get an accurate pulse.
Counting can be tricky as well considering you may confuse the seconds that go by on a clock with the pulse rate. To avoid this, you should only glance at the clock you are using and look away focusing your mind on the patient’s pulse. Keep taking quick glances at the clock until you reach 60 seconds.
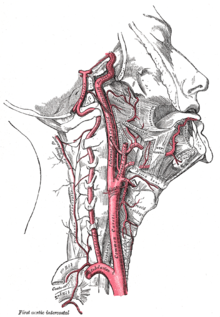
Carotid Pulse
A carotid pulse is taken very similarly to the radial pulse. The only difference is the place the fingers are being pressed. The carotid artery is in the neck and can be slightly harder to find than the radial but at the same time, it has a stronger push for easier feeling.
The easiest way to find it is to put your fingers on the back of the patient’s ear and slowly slide your fingers down the neck until you feel the jawbone. Then slowly work your way down the neck right below the jawbone until you feel that push.
Again, your fingers should push down ever so slightly so enough pressure is applied to feel the pulse. Check the other side of the neck if you are having trouble. Once found, count the pushes for one full minute glancing at the clock as to not confuse the pulse rate itself and the seconds going by.
The Result
The average pulse is between 60-100 bpm in a relaxed state. Up to 120 may be acceptable if the patient has recently performed any amount of physical activity. If this is the case, it is best to wait about five minutes to get the best and most accurate reading.
When I check a patient’s pulse rate, if it is higher than 120 or lower than 50, the certified nursing assistant (CNA) is required to let that patient’s registered nurse (RN) know. This gives you an idea of what is acceptable. Anything abnormal needs to be further examined in a professional facility if it lasts longer than a few minutes.
Measuring and Recording the Patient’s Pulse Rate
Step by Step Instructions
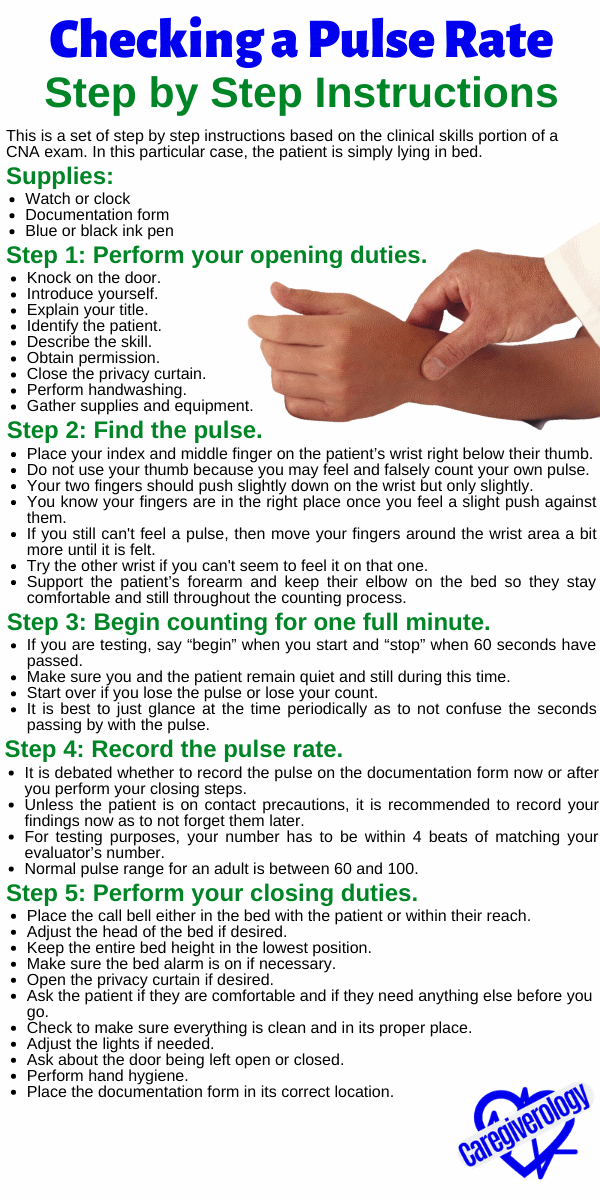
This is a set of step by step instructions based on the clinical skills portion of a CNA exam. In this particular case, the patient is simply lying in bed.
Supplies Steps: 1 2 3 4 5 Download and print these instructions here (pdf)
Supplies:
- Watch or clock
- Documentation form
- Blue or black ink pen
Step 1: Perform your opening duties.
- Knock on the door.
- Introduce yourself.
- Explain your title.
- Identify the patient.
- Describe the skill.
- Obtain permission.
- Close the privacy curtain.
- Perform handwashing.
- Gather supplies and equipment.
Step 2: Find the pulse.
- Place your index and middle finger
on the patient’s wrist right below their thumb. - Do not use your thumb because you
may feel and falsely count your own pulse. - Your two fingers should push
slightly down on the wrist but only slightly. - You know your fingers are in the
right place once you feel a slight push against them. - If you still can’t feel a pulse, then
move your fingers around the wrist area a bit more until it is felt. - Try the other wrist if you can’t
seem to feel it on that one. - Support the patient’s forearm and
keep their elbow on the bed so they stay comfortable and still throughout the
counting process.
Step 3: Begin counting for one full minute.
- If you are testing, say “begin”
when you start and “stop” when 60 seconds have passed. - Make sure you and the patient
remain quiet and still during this time. - Start over if you lose the pulse
or lose your count. - It is best to just glance at the
time periodically as to not confuse the seconds passing by with the pulse.
Step 4: Record the pulse rate.
- It is debated whether to record
the pulse on the documentation form now or after you perform your closing
steps. - Unless the patient is on contact
precautions, it is recommended to record your findings now as to not forget
them later. - For testing purposes, your number
has to be within 4 beats of matching your evaluator’s number. - Normal pulse range for an adult is
between 60 and 100.
Step 5: Perform your closing duties.
- Place the
call bell either in the bed with the patient or within their reach. - Adjust
the head of the bed if desired. - Keep
the entire bed height in the lowest position. - Make
sure the bed alarm is on if necessary. - Open
the privacy curtain if desired. - Ask
the patient if they are comfortable and if they need anything else before you
go. - Check
to make sure everything is clean and in its proper place. - Adjust
the lights if needed. - Ask
about the door being left open or closed. - Perform
hand hygiene. - Place
the documentation form in its correct location.
Pin this content!
Save This Guide
